Tired of Expensive Website Uptime Monitoring Services? Build Your Own Uptime Monitor, 100% Free
Our Free Website Uptime Monitor Runs in Google’s AppScript Environment, and Is 100% Effective and 100% Free. Follow These Instructions to Build One for Yourself or Your Agency
Website uptime has consistently been understood to be a ranking factor; it’s obvious that a search engine would tend to reward a website that was consistently online. And, if you are an agency that works on websites or undertakes SEO, your clients might expect you to be taking some steps to ensure reliability. It’s a great tool to offer clients with real value that doesn’t cost anything. Also, downtime is death to conversion rates. We use it at our SEO Agency every day.
If you want to skip the blah-blah, scroll down to “Let’s Get Coding”.
Why are we giving away this free tool?
- If you like it and use it, maybe you’ll link to our homepage or to this post? (Please?)
- It was fun to build, seriously!
So Simple, Why Pay for Uptime Monitoring?
And so, a host of 3rd-party services have sprung up to offer paid “website uptime monitoring” services. You know the drill….you get a 2-week trial and after that, it’s a monthly fee to get alerts when your website goes down. Such services and some of the pricing include:
- Site24x7.com,
- UptimeRobot.com, chares up to $54 a month for up to 200 sites.
- DataLog
- Uptime.com
We’ve used them, we’ve paid for them. But we’ve used this free version for about a year and it’s worked perfectly. There are a bunch of free monitors online, but most only check for 200 status and not for a particular string…
Let’s Start Coding/Building the Uptime Monitor
You will need:
- Google Sheets (Google’s free spreadsheet app at drive.google.com or docs.google.com)
- That’s pretty much it, we’ll be writing some code in Google Apps Script, but that is included in Google docs.
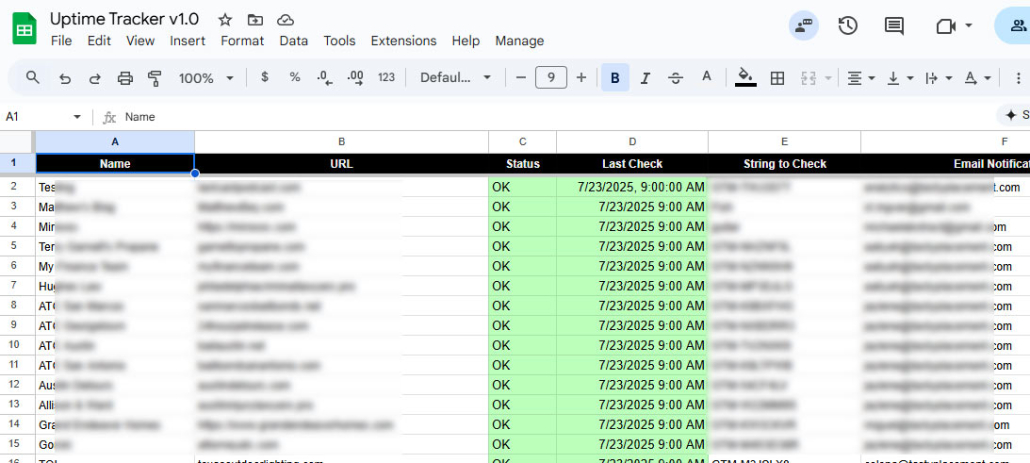
Here’s what it will look like when finished:

Here are the columns we’ll be building:
- Name, just a name for the website you are tracking
- URL, the actual URL to check
- Status, The Status column is handled by the script
- Last Check, The Last Check column is handled by the script, this updates as the script runs periodically
- String to Check, this is the actual string you want the script to read. We use GTM codes, but you can use any string of text
- Email Notification, this is an email where you want a notice of site outage to be sent (there is also a default in the script, more on that below
Step One: Create & Populate a Google Sheet
Open google sheets and start a new document, and do this exactly:
- Name the document
- Make these exact fields at the top in fields A1 to F1
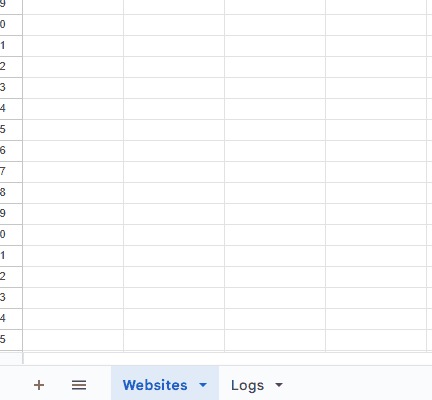
- Important! You have to name the first sheet “Websites”, the script needs that identifier
- Make a second sheet called “Logs”, see the second screenshot
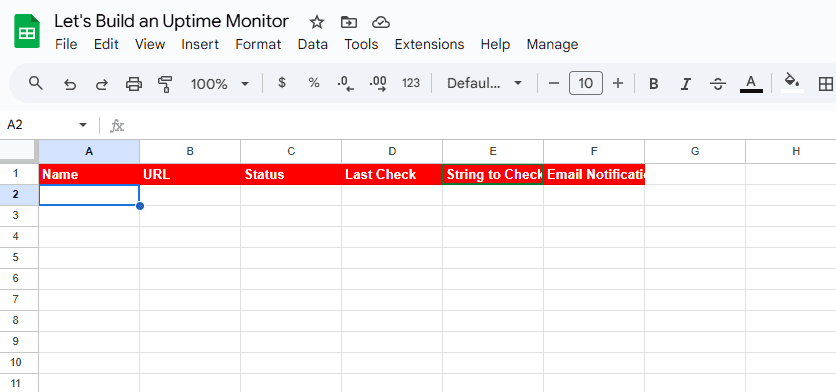
Don’t forget to name your sheets!
Next, we want to associate an AppsScript project with our Google Sheet, to do that we navigate to Extensions and then click Apps Script, which I realize that I write as “AppsScript” all the time.
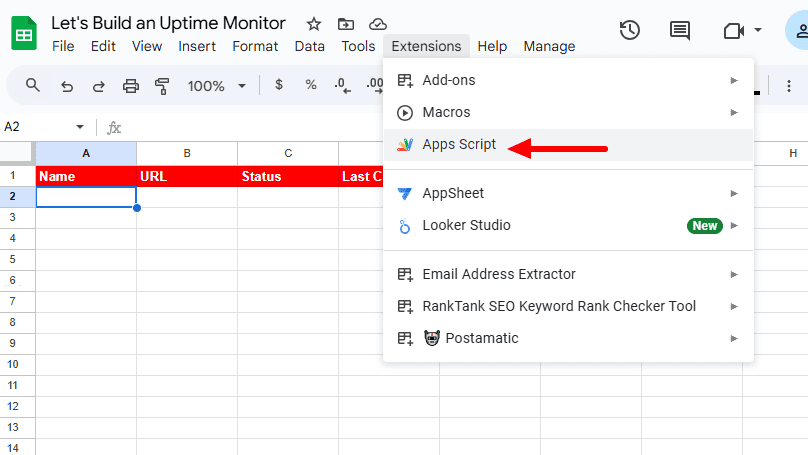
When you first navigate to Apps Script, you will create a new Apps Script document that is associated with the Google Sheet. The next time you navigate here, you’ll be editing that same Apps Script Document.
Here is your blank Apps Script, where we’ll be writing code. In this main window, the file “Code.gs” is indicated, and in this edit window we will paste our code. Now we’ll move on to step 2:
![]()
Step 2: Where We Actually Code the Free Website Uptime Monitor
We are pretty much done with our Google Sheet, now we do our work on the associated Apps Script. If you closed your Apps Script window, simply open the Google Sheet and navigate to Extensions and then Apps Script. I had a problem in one account with Apps Script not opening, so I tried another Google account and it worked fine.
What follows is the full script. Simply paste this into the “Code.gs” edit window in Apps Script, replacing the default lines 1 through 4. I have marked up this code with explanations of each section. Near the bottom you can set your own email instead of the dummy email indicated.
// Create custom menu when spreadsheet opens.
// These create a menu item that lets us manually run the script
function onOpen() {
var spreadsheet = SpreadsheetApp.getActiveSpreadsheet();

var menuOptions = [{
name: 'Check Status',
functionName: 'checkStatus'
}];

spreadsheet.addMenu('Manage', menuOptions);
}

// Check status of each website in Websites sheet.
function checkStatus() {
var sheet = SpreadsheetApp.getActiveSpreadsheet().getSheetByName('Websites');
var rows = sheet.getDataRange().getValues();

// Remove/Bypass that first column headings row.
rows.shift();

// Clear the existing Status and Last Check columns.
sheet.getRange('C2:D').clear();

// Loop through rows in sheet and make a request to website url.
// This really is the meat of the script.
for (var i = 0; i < rows.length; i++) { ///is the first row throwing us off?
var row = rows[i];
var name = row[0];
var url = row[1];
var stringToCheck = row[4]; // Get the string to check from column E
var recipient = row[5]; // Get the recipient email from column F
var status = 'OK';
var color = '#bfb';
var timestamp = Utilities.formatDate(new Date(), Session.getScriptTimeZone(), 'M/d/Y h:m a');
var issues = 0;

if (url) {
try {
var response = UrlFetchApp.fetch(url, {muteHttpExceptions: true});
var responseCode = response.getResponseCode();
var responseBody = response.getContentText();

// Check if the response code is greater than 200, indicating an issue.
// But this really makes 2 checks, one for the response code and...
// One check for the presence of the string.
// the "color" commands change the field color to alert to a problem
if (responseCode > 200) {
status = 'ISSUE='+responseCode;
color = '#faa';
issues++;
} else if (stringToCheck && !responseBody.includes(stringToCheck)) {
// If the specified string isn't found in the body, it's an issue.
status = 'STRING MISSING';
color = '#faa';
issues++;
}

// Update Status and Last Check columns with results.
sheet.getRange(i + 2, 3, 1, 2).setValues([[status, timestamp]]).setBackground(color);

} catch (e) {
// Handle errors gracefully if UrlFetchApp fails (e.g., timeout, etc.)
status = 'ERROR'+e;
color = '#faa';
issues++;
sheet.getRange(i + 2, 3, 1, 2).setValues([[status, timestamp]]).setBackground(color);
}

// Rate limit the requests to avoid being blocked.
Utilities.sleep(1000);

// If recipient is defined, notify that person.
if (status != 'OK'){ //only send if it's not good
if (recipient) {
notify(recipient,url,name,issues,status); // Pass recipient to the notify function
} }
}
}

// Notify me if there are issues.
if (issues > 0) {
iteration = 'owner-notifies';
notify(recipient,url,name,issues,status); // Still notify the document owner (default behavior)
}
}

// Send email notification. Sends to document owner AND to any "recipient" from Column F.
// You can put a default email two lines down, I have a dummy email here
function notify(recipient = Session.getEffectiveUser().getEmail(),urlSite,name,issues,status) {
var recipient2 = 'waldo@fakewebsite.com'; //sending to default users
var subject = 'Website Down! Site:' + name;
var body = 'Check spreadsheet for issues found.';
var spreadsheetUrl = SpreadsheetApp.getActiveSpreadsheet().getUrl();
var html = '<p>Check <a target="_blank" href="' + spreadsheetUrl + '">spreadsheet</a> for issues found. Or click on the site <a href="' + urlSite + '">URL</a>. The issue is: ' + issues + ' and the status is: ' + status;
var options = { htmlBody: html };

// Here's the part that actually sends the email on a failure.
if (MailApp.getRemainingDailyQuota() > 0) {
MailApp.sendEmail(recipient, subject, body, options);
MailApp.sendEmail(recipient2, subject, body, options);
}
}
Last Step: Let’s set it to check uptime automatically
We don’t code this, we change a setting in Apps Script. Screenshots will help here:
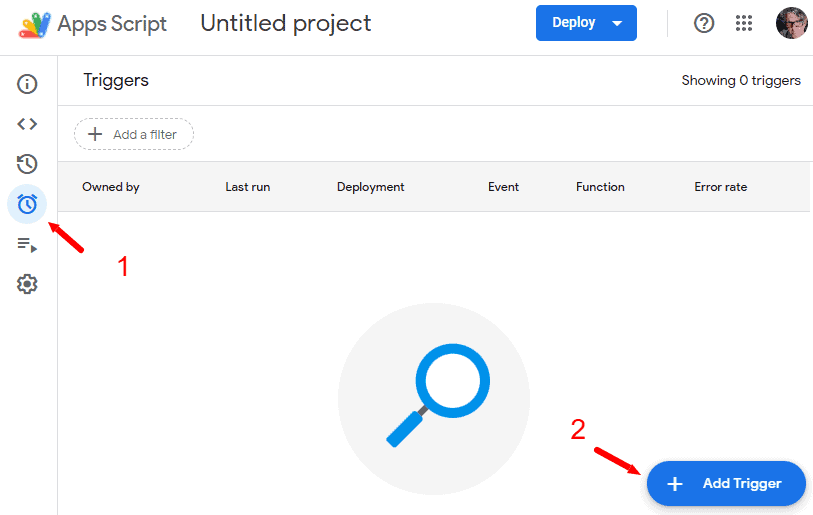
First, we click the little clock and click “Add Trigger”
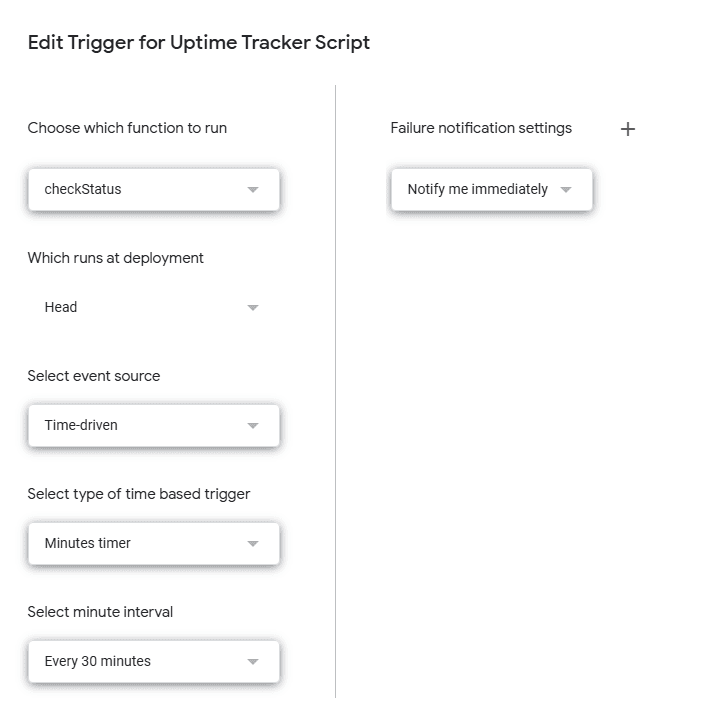
Then simply set your Trigger to look like this. Essentially we are setting the trigger so that the script runs every 30 minutes. We never had a problem at 30 minutes, faster than that and you might get blocked by a server.
So, yep, make your trigger like this:
Let’s manually test the script
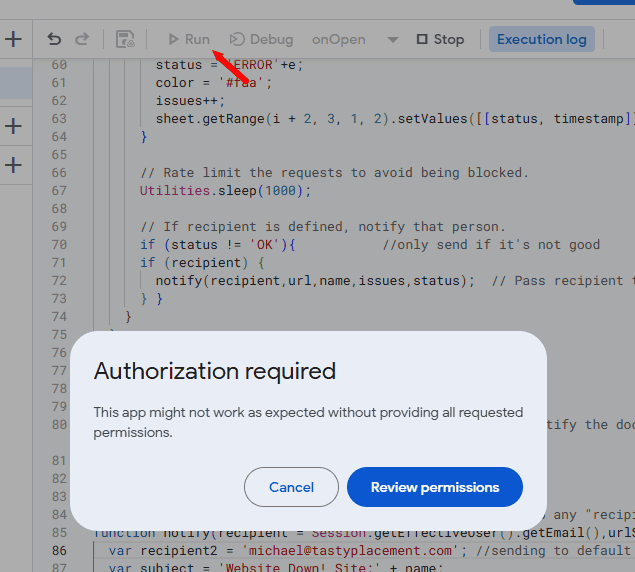
First we have to authorize the script, you are sending a bot out to read websites, so you have to approve it, you’ll only need to do this once.
From Apps Script, use the “Run” button at the top and follow the standar authorization steps:
Great, now return to your spreadsheet.
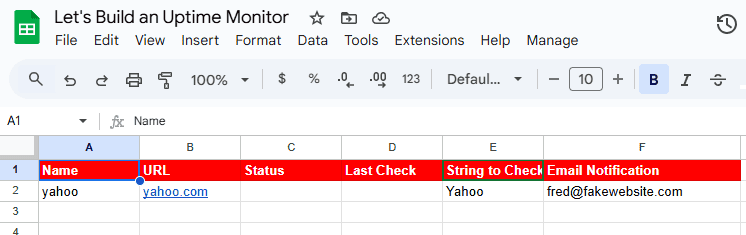
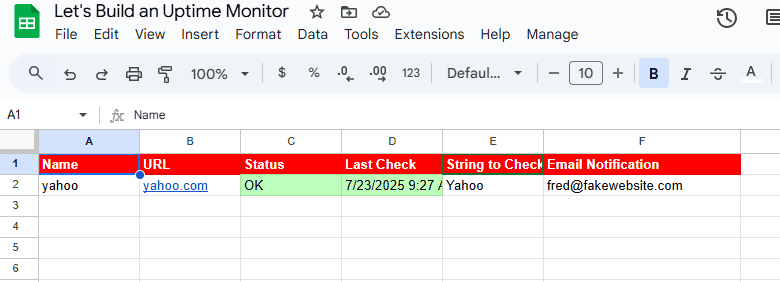
Do an initial configuration, something like this. You won’t have “Status” or “Last Check” yet, the script fills those in:
Now, you are ready to test manually. From the Google Sheet, go to Manage and then Check Status. Remember, our code added these elements in the first few lines of the Apps Script. If this menu item isn’t there, that’s your problem, the Script isn’t connected.
So here is my first test below. I set the “String to Check” to “Yahoo” because I know that string appears on the URL Yahoo.com. So I would expect an “OK” test and sure enough, I got the following response and no email:
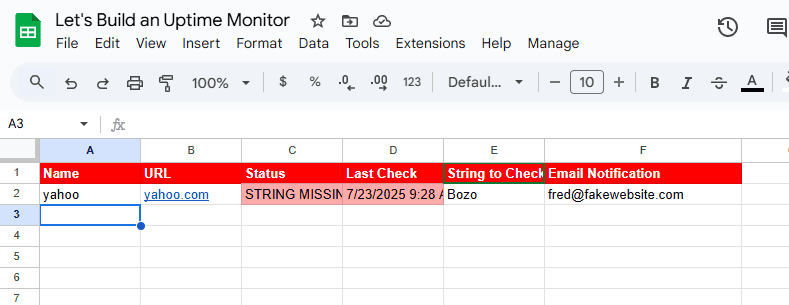
Now let’s test for failure. This time I set the “String to Check” to “Bozo”–just a random word. So, I would expect the uptime monitor to fail (simulating a website than had gone down or was hacked, or some similar failure) and sure enough, I get a failure and an email sent to me.
So how does the uptime monitor really work, in essence?
Basically, you are calling UrlFetchApp.fetch from Apps Script and Google sends a bot and stores the text on the page.
Next the script checks for a 200 response code and tries to match your string from the spreadsheet with what is read on the page of the URL.
After that, the script writes to the Google Sheet and sends an email on failure.
We run this script with about 50 websites for over a year and it’s worked fine.
If you use this script:
Please, link to this page from your website…
Thank you for your time,
Michael David…I CODED THIS!!!


Leave a Reply
Want to join the discussion?Feel free to contribute!